


In Exportizer, you have several ways to import data into your target database.
1. Export Data
Data importing works similarly to exporting, where the source and the target are swapped. So, just open your source database and then export data to the target database using Database target format.
Note: This method is available in Exportizer and Exportizer Pro.
2. Drag Folders and Files from Windows Explorer
If your source data comes from folders and/or files, just select them in the Explorer and drag and drop them into Exportizer with open target database. Note: The same functionality is available by choosing Import | Import Database Files... menu.
In Exportizer and Exportizer Pro, the first selected item will be opened as a data source. If there was an open database before, it will be closed.
In Exportizer Enterprise, Import Files dialog will appear where you choose what to do with selected folders and files.
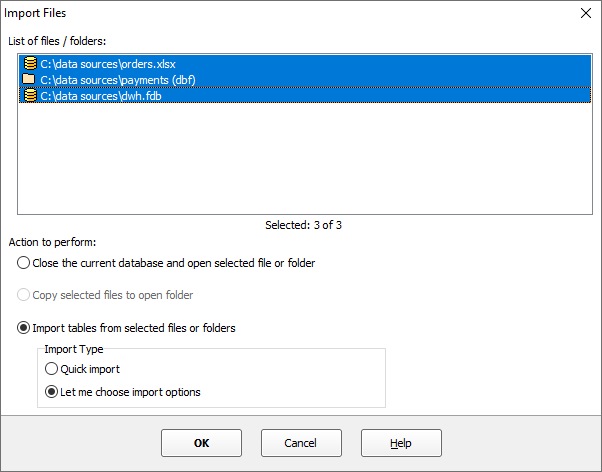
This dialog has several parts:
List of files / folders to import
Here, you can review what the application is going to import. You can deselect items mistakenly selected on the previous step.
Action to perform
You can choose what to do with selected files and folders:
- Close the current database and open selected file or folder. If you choose this option, the current Exportizer database will be closed and the application will try to open one selected item.
- Copy selected files to open folder. This option is available, if the current Exportizer database is a physical folder with data files (e.g. dBase). If you choose this option, the application will try to copy selected items to that folder.
- Import tables from selected files or folders. This is the most powerful option. You can decide how to proceed:
- Quick importing. In this mode, the application tries to create a new table in the current database for each table found in the dragged files. After creating a table, it imports the data to it: all columns and all records.
- Let me choose import options. In this mode, you control every step and every import option. You can choose either to overwrite existing tables or append data to them, specify table and field mappings between source and target, and much more.
In a step-by-step example, you can see how Exportizer imports different kinds of dragged database files.
3. Paste Tabular Data from Clipboard
If your clipboard contains some tabular data (e.g. copied from Excel etc.), you can paste it into a table opened in Exportizer. Use Ctrl+Alt+V combination or Paste Cells From Clipboard item from Tools menu or from context menu of the data grid.
Note: If you need to append clipboard data to destination table which is not empty, you need some preparation. First, locate the last record in the table, then press down arrow key: this switches the dataset into Append mode and creates a blank row in the data grid. Then select the needed cell in the new row and press Ctrl+Alt+V.
4. Import Any Data from Clipboard
This method looks similar to the previous one (pasting data from clipboard), but is much more powerful. It has the following benefits:
- accepts any field separator (not only TAB);
- accepts data in fixed-length format;
- allows to create a new table from the clipboard data;
- allows to choose columns;
- allows to change the order of columns;
- allows to add calculated fields.
Of course, to use all the benefits, the data require some preparation. The interface allows to define the data structure, i.e. the field separator and the names, types, and sizes of the fields. In most cases, the application can do this automatically, and the user only has to confirm.
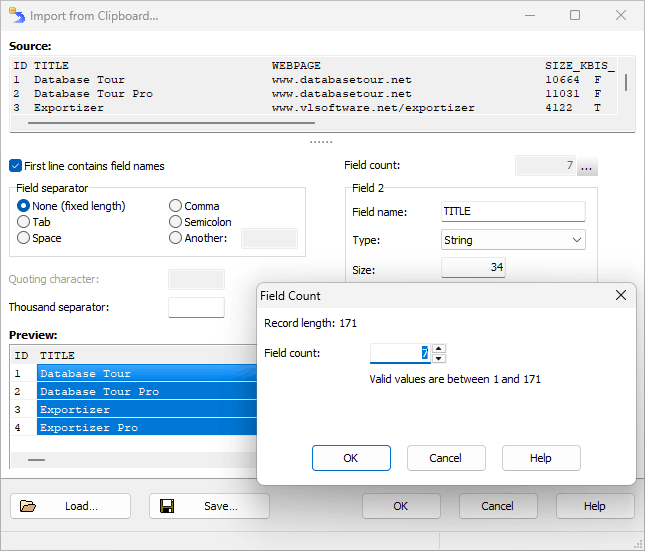
After the clipboard data are turned into a table compatible structure, the standard export/import interface is invoked where you can flexibly configure how the input data must be imported into a new or existing target table.
To start the process, copy the source data to clipboard, open your target database and choose Import | Import from Clipboard....
Notes
- Field data should not contain line breaks.
- For large text fields, it is recommended to choose Memo type instead of String, because it uses less memory.
- The number of rows for automatic data structure analysis, as well as the number of rows in the clipboard data preview, depends on the corresponding data exporting option.
- This method is available in Exportizer Pro and Exportizer Enterprise.
5. Import Data from a Text File
This method works very similar to importing data from clipboard (see above), but uses a structured text file as a data source. The interface and limitations are the same.
To start the process, open your target database and choose Import | Import from Text File....
Notes
- File must not be too large.
- Field data should not contain line breaks.
- For large text fields, it is recommended to choose Memo type instead of String, because it uses less memory.
- The number of rows for automatic data structure analysis, as well as the number of rows in the clipboard data preview, depends on the corresponding data exporting option.
- This method is available in Exportizer Pro and Exportizer Enterprise.
See also